While in Chicago, we stopped by the Chicago Architecture Foundation and discovered the Chicago Modeland the LEGO Design Studio, where families can build a representation of a current architectural piece, or create an original design. While my husband and daughter sat down to build, I started taking pictures, thinking this would be a great addition to my Makerspace. While the exhibit featured white architectural LEGO pieces exclusively, I think it would be feasible to use whatever color of LEGO pieces you have available.
The exhibit featured pictures of famous architectural buildings in Chicago that visitors could replicate. In a Makerspace, you could display pictures of famous buildings from around the world for students to reproduce.
Santa Fe Building
Other visitors had created original designs to be left on display, including buildings, boats, dragons, and furniture. As students build pieces in your Makerspace, you could display them as inspiration for other students.
Building with lots of windows
Boat and Buildings
Pianos
Star Wars Pieces
In one section of the Design Studio, visitors could add to the "growing city" by drawing a building on a long piece of paper that covered a section of the wall. This would be another great thing to add to a Makerspace ~ either a paper version, a LEGO version, or a cardboard/recycled materials version. Students could work collaboratively to build a replica of the city you reside in, a city you are studying, a city from an historical time, or an "ideal city" your students imagine. The additional prompt of "What does every good city need?" can get your students thinking beyond buildings to parks, roads, transportation, and infrastructure.
I love to gather ideas from places I visit. Chicago has provided a lot of inspiration for me this past week. Where have you been inspired for your Makerspace?
Last week my daughter attended a STEM camp at Loyola University in Chicago. Each day we stopped in the lobby of the Institute of Environmental Sustainability building, where we saw these rain barrels:
While it would be neat to make and decorate a rain barrel as a class, it might not be financially feasible, depending on your classroom budget and access to materials. Another environmental awareness option could be trash cans. In Missouri, the Department of Conservation offers the "No More Trash" Contestto encourage students to fight litter. Classes decorate a thematic trash can and enter it in the contest. Check out the 2016 winning classes here.
I think a school building could also have a trash can decorating contest to encourage students to reduce, reuse, and recycle. It could be held at the beginning of the school year, or in conjunction with Earth Day in April. It could certainly be a Makerspace-friendlyproject, where students could repurpose materials to creatively decorate the trash cans.
At an elementary building where I taught, one of the 7 Habits Leadership Groups collected paper recycling from each classroom once a week as part of their environment project. Classes who recycled correctly were awarded student-made badges for their recycling bins. It was a win-win situation for the students, teachers, and custodial staff.
What ideas do you have to promote environmental awareness with students?
Last week my daughter attended a STEM camp at Loyola University in Chicago. As we walked through the Lake Shore Campus, we found many signs that described the landscaping design. I plan on sharing these examples with my students during Innovation Hour. They are eye-friendly infographics that explain in clear language the thought process that went into an eco-friendly design.
As innovators, we want our work to begin with empathy. Students need to understand the audience for whom they are designing, while also considering the impact on plants, animals, and the environment.
Reading these signs made me wonder what impact our decades-old school buildings have on the environment. What steps could we take as a class to improve the environmental impact of the current building design? Are we affecting plants, wildlife, or the air quality in our neighborhoods? These questions would be great ones to pose and address as part of an environmental study PBL or as part of an independent study project. It would also provide an opportunity to connect with community-based organizations that focus on environmental topics.
Have you found infographic examples that demonstrate empathy in the design process to share with your students?
Last week, my daughter attended a STEM camp at Loyola University in Chicago. The Lake Shore Campus is breathtaking ~ combing gorgeous landscaping, beautiful architecture, and exceptional design elements to promote environmental sustainability.
Our first evening stroll through campus revealed this beautiful thought, "May peace prevail on earth". This photograph only captures the English version, but each of the four sides had the message displayed in two languages ~ a powerful statement of hope.
Read the original post of how I use Fun Finds on Fridays.
This week's finds:
1. Brilliant- Website designed to help you excel in math and science. Users can "learn from wiki pages and problems written by a community of mathematicians, scientists, and engineers". Students can choose from subjects such as algebra, geometry, basic mathematics, chemistry, computer science, and electricity and magnetism.
2. Pantheon - Visualizes global culture by analyzing data. Check out their Tree Maps, Matrices, Scatterplots, and Maps ~ all are awesome!
3. The 30-Second Brain Test - Which side of your brain is more dominant? Take this 30-second test to find out.
4. DIY - Kids can learn how to do some amazing things - from other kids! They can try a challenge, get peer feedback, and earn badges.
One of our Makerspace sessions this month is a poster session at ISTE in Denver. I attended ISTE for the first time last summer with an eLearning team from my school district. Of all the professional development opportunities I have experienced in my twenty year career, ISTE has had the biggest impact. Twenty thousand people convened in Philadelphia in June of 2015 to learn more about technology in education, and I was fortunate to be one of them.
The ISTE format is the ultimate "Design Your Own PD" experience. You can mix and match from a variety of formats to best meet your learning needs: lectures, panels, research papers, snapshots, forums, interactive lectures, poster sessions, learning academies, playgrounds, and workshops. And, you choose the content that is most applicable to you.
I had the best time at the playgrounds (STEM, Maker, Digital Storytelling, Creativity, Mobile Learning, Games and Virtual Environments, Ed Tech Coaches, and InnovativeEducation), where you could listen to short "how to" presentations, then try the tech out yourself. I gleaned lots of information from visiting with presenters at the posters sessions, where you can sweep through the room and gather perspectives from across the country on a featured topic.
One of my most memorable sessions was a littleBits interactive workshop, where I worked with a team of seven to complete a challenge. We grouped ourselves together randomly, and my small group represented educators from three countries and four states. It was exciting to be part of a team gathered for just thirty minutes, that represented seven different grade levels/subject areas, and had such global diversity. We talked about what education looked like in our part of the world, and how we could integrate littleBits into our specific learning environments.
I am excited/scared/nervous/anxious about presenting next week. I love that we will be part of the Makerspace Poster Session environment. I will learn so much from the other presenters in the session who share my passion for maker environments. I will learn so much from those walking through to visit with us about how the Makerspace concept works in our setting. And, that will just comprise two hours of a four day conference. So much learning!
Two years ago I converted my classroom to a Makerspace environment. In preparing for a couple of professional development sessions we are presenting this summer, I have been reflecting on what has helped the Makerspace concept be successful in my classroom. Here are some tips!
Makerspace Tips
M - Make learning meaningful. Makerspaces are full of opportunities. Students can "make" to show their learning on a topic, demonstrating how they are meeting the learning standards for your district. They can "make" as part of genius hour/passion projects/independent study/innovation hour. They can make in response to a teacher prompt. Or, they can make as part of a PBL project.
A - Ask for donations of supplies. Give parents, staff, and the community a list of materials you would like to add to your space. I have received LEGOs, wood and foam scraps, sewing supplies, art materials, and more. People are very generous, and are often looking for a place to donate things they no longer use.
K - Keep it organized. I use tubs to sort cardboard, plastic, and Styrofoam. I put picturesin LEGO kits to help keep the pieces in the right place. I sort materials by the type of supply. Ikea has fun and inexpensive containers, and the dollar spot at Target is a great place to visit. (Okay, Target in general is a great place to visit.)
E - Expand the possibilities of your space. Find open-ended supplies that will enable students to do a variety of different things. Some examples include Makey Makey, Green Screen, Raspberry Pis, Circuit Stickers, Squishy Circuits, and Roominate.
R - Robotics. There are some really cool robots available to add to your space, in a range of prices. I have added Ozobot, Wonder Workshop's Dash and Dot, Cubelets, Snap Rover, and LEGO WeDo.
S - Start with what you already have. I started with the art supplies that had accumulated over 18 years of teaching. My first summer, I saved cardboard tubes from toilet paper and paper towel rolls. I collected cardboard boxes, plastic lids, Styrofoam from packages, and plastic containers from food items. If you have an iPad, you can download a stop motion animation app and be on your way. Kids can take apart old technology to see how it works, then repurpose the materials to make something new.
P - Passion Projects. If you run a genius hour/innovation hour/20% time, students can use the materials in your Makerspace to create "answers" to "problems" they have identified.
A - Add materials over time. Start adding materials in your classroom budget. Write proposals and grants through websites like Donors Choose, Think It Up, Kids in Need, and local foundations.
C - Challenges. There are so many challenges out there. Use your Makerspace to participate in the International Cardboard Challenge, LEGO creative uses challenge, Wonder Workshop Robotics Competition, Hour of Code, Rube Goldberg Challenge, or Google Science Fair. Watch social media channels to spot additional challenges ~ they pop up all the time!
E - Even more ideas. Play with polymers. Use 3D Doodler Pens. Try claymation. Solve a problem in the world. Complete a STEM challenge. Learn to program. Just tinker!
Read the original post on how I use Tech Tip Tuesday.
"Teachery" Tech Tips for this week:
It's summer, so my focus will be on Tech Tips that can help teachers in their classrooms.
1. ViewPureallows you to "watch YouTube videos without comments, ads, or other distractions". It's in beta, and just as awesome as it sounds! I've been using it extensively this week while I've been building a course in Moodle(which is equally awesome for blended learning).
2. EdPuzzle allows you to crop, add your own audio track, record audio notes, and ask questions of the viewers. You can pull videos directly from YouTube, Khan Academy, LearnZillion, National Geographic, TED Talks, Vimeo, and more! You can even use content developed by other EdPuzzle users. It will send your creations directly to your Google Classroom, if you wish, or you can use the URL link. Another exceptional tool for blended learning!
3. youcubed, sponsored by Stanford University, offers a week of iMath with lessons and activities for use in your classroom. Jo Boaler specializes in growth mindsets and the field of math, and offers an extensive research-based collection of amazing resources on the site. Check it out!
I have never been able to draw. I have a standard stick person (which covers both genders and all ages), a stick animal (which encompasses animals of the land, see, and air), and a basic house, tree, and flower. Any time I play a game with my own children that requires drawing, I just groan. And silently question why Santa brought those games to begin with - what WAS he thinking?
This winter, Santa brought an independent drawing game that both the kids and I LOVE. Not because I can draw now, but because it requires creative thought! (And, one person can play by themselves, relieving me from a drawing requirement.)
The Extraordinaire Design Studio is described as "a creative thinking game for problem solvers. If you've ever wondered what it's like to invent a music player for a robot, a remote control for a pirate, or a cooking utensil for a vampire teen, this game is for you." This is an amazing opportunity for children to be creative!
In the above image, my daughter drew the Extraordinaire card "future child" and the project card "ceremony place". Her design title is China's New Year, and she has created a transportation tube, reusable fireworks (maybe because our family describes fireworks as watching your money burn up in front of you), a hover board, a floating dragon, and the future child with flaps and rocket boots.
As for me, I still can't draw. But, I am trying. I have been working on developing a Growth Mindset along with my students, grades kindergarten through eighth. In most areas, I do have a growth mindset, but when it comes to drawing, I have a fixed mindset. Fixed as in "set in concrete and never going to change type of mindset". So, as an example to my students, I am working on drawing. I know that I will never be great at drawing, but I can get better.
Here is a "before" example:
We were playing Who What Where Jr. The Funny Drawing Game for Kids. In this game, you draw three cards: a who, a what, and a where, and combine them into a picture. Using my interpretive skills, I think this example was a snake/worm, flying a kite, in a barn. My family always lets me draw multiple cards of each category, knowing that I need to find something that I can make halfway recognizable for them.
While my drawings are more recognizable (my goal), and a huge step forward from the snake/worm flying a kite in a barn, I still need the heavily structured advice of the book. I can work step-by-step through a lesson and draw a picture that my family can recognize. I am not yet able to transfer my skills to a random drawing situation (which I still avoid at all costs). But, I have only completed seven lessons (in four months). And, as I tell my students, a growth mindset means "I can work hard and improve", so I will keep working.
Read the original post of how I use Fun Finds on Fridays.
This week's finds:
1. Secrets of the Snowy Owl - Watch this video to "follow the migration path of Baltimore, the young male snowy owl outfitted with a GPS transmitter backpack for a research project called Project Snowstorm."
Many names - similar purpose - a time when students are allowed to independently (or collaboratively) investigate topics of their choice. In my classroom, it is the highlight of every grade level of students I work with - first through eighth. They love the chance to delve deeper into their passion areas.
The best video I have found for launching this part of our day is The Time You Have (in JellyBeans). It helps students realize the importance of focusing on something they are passionate about.
After viewing the video, and thinking carefully about the limited amount of time we have to focus on things we are truly passionate about, we brainstorm a list of things we want to learn more about.
During the next session, we try to narrow down our focus of study (knowing that this is always flexible). Most of my students have two or three different projects they are working on, and will move fluidly between them. At first I worried about this, but after reading Steven Johnson's Where Good Ideas Come From: The Natural History of Innovation, I realized that an innovator needs to let an idea simmer in the back of the mind for a while (maybe even for a decade), waiting for it to connect with the missing pieces of the puzzle before it can be acted upon.
An example of a student project:
Writing, casting, acting, directing, and editing a movie. On the side, developing a plan for a natural grocery store, creating advertising, and analyzing potential revenue and expenditures.
Check-in Process:
As part of our check-in process, each student briefly shares what he or she worked on that day, struggled with, or had questions about. It is through this process that we discover how we can be the "missing pieces" for others. In the student example above, one classmate stepped in to sew the costumes for the actors in the movie, one stepped in to create the special effects, and one stepped in to help design the props. While each student was working on their "individual projects", they discovered that they could use their area of passion to help each other be successful.
Providing Inspiration Along the Way:
As the year progresses, I share inspirational stories and video clips about innovators from around the world. I watch for features about students and adults who have worked to solve problems through innovation - in a variety of fields. Kids need to know that regardless of their passion area, they can make a contribution to the world. TED has a playlist of 8 Talks to Inspire Projects With Kidsthat is a great resource to encourage students to tinker, make, and innovate.
Final Products:
In our room, we share our "final" products when they are individually done. We don't have a set deadline for the class. Each student works at his or her own pace, and I help guide, nudge, and encourage them along the way. Some students work on one idea in-depth for the entire school year. Some work for a semester, a quarter, a month, or just a week, then move on to another area. Each student is allowed great control over the length of time they spend on a topic, and can abandon it or set it aside for a while as needed. I honor student voice in this way, because I am noticing, documenting, and visiting with them about their interest areas, attempts, success, and growth as a learner. Through this process, we have had had a wealth of products created and shared. These include: models of businesses, creation of original stuffed animals, toys designed for pets, plays written, polymers investigated, original games coded, languages studied, vocal ranges increased, blogs created, public service announcements produced, movies made, chess studied, programming languages learned, websites developed, commercials made, and music composed.
Innovation / Genius Hour Symbaloo Webmix:
(A living document that will be edited and updated)
The top purple area links to ideas for launching a genius hour
The pink portion comprises innovator resources
Teal represents foreign language links
Greenlinks to kid-friendly search engines
Grayfocuses on compassion connections
The other shade of purpleis for video conferencing
Blueis presentation tools
The Next Step:
We have started to add a global compassion connection to our independent study time. It consists of connecting each student and their passion area to a person in a different country, who has a similar passion area. This project is in its infancy, but I will be blogging about it in the future!
We recently visited the Nelson-Atkins Museum of Art, and my daughter was thrilled that the museum offered booklets for children to work in as they visited many of the collections.
We eventually worked our way to the Japanese collection and discovered a collection of poetry. Visitors were asked to write a poem after viewing the screens, scrolls, woodblock prints, ceramics, and sculptures. They could choose to take their poem with them, or contribute to the collection, which is show in the image below.
A notebook of "Poetic Inspiration" was available for visitors to look through while they wrote their poems.
I think this idea would make a great addition to a classroom or library. Contributors could write a poem and add it to the collection.
Read the original post on how I use Tech Tip Tuesday.
I recently attended Chromebooks in the Classroom training courtesy of MOREnet. Next year, our middle school is going 1:1, and an elementary building and our high school should be 2:1. I learned a lot of helpful tips and tricks, and would share the following ones first with students.
Chromebook Tech Tips:
1. Use the search key (magnifying glass where caps lock usually is). It opens a smaller window to do a Google search and is a shortcut to apps.
2. Keyboard Shortcuts: Use Control, Alt, and ? to highlight what the shortcuts are. When the smaller window is open, hold in on Control, Alt, Shift, or Search (magnifying glass) individually to see what the shortcuts are ~ Game Changer!
3. Make a Split Screen: Use Alt { to split your screen to the left. Use a second time to make it smaller, and a third time to go back to original size. Alt } does the same thing for a right split.
Ideas.Ted.Com's article How to turn small talk into smart conversation is a gem for those looking to move small talk to a deeper level. It includes tips from a comedian and a journalist on how to ask for stories, not answers, break the typical "mirror" response to small talk conversation, and leapfrog over the expected responses to move conversation along.
I find that students need guidance to enhance their surface-level conversational skills. I model the prompts in the article to help guide students to deeper, more meaningful conversations. It's fun to try these prompts when you converse with adults too.
3. Wonderopolis - "Where the wonders of learning never cease" - Be curious, and learn all kinds of interesting things. You can even post what you are wondering.
4. Beat Maker by Splice - Compose your own beat, or listen to the creation of others
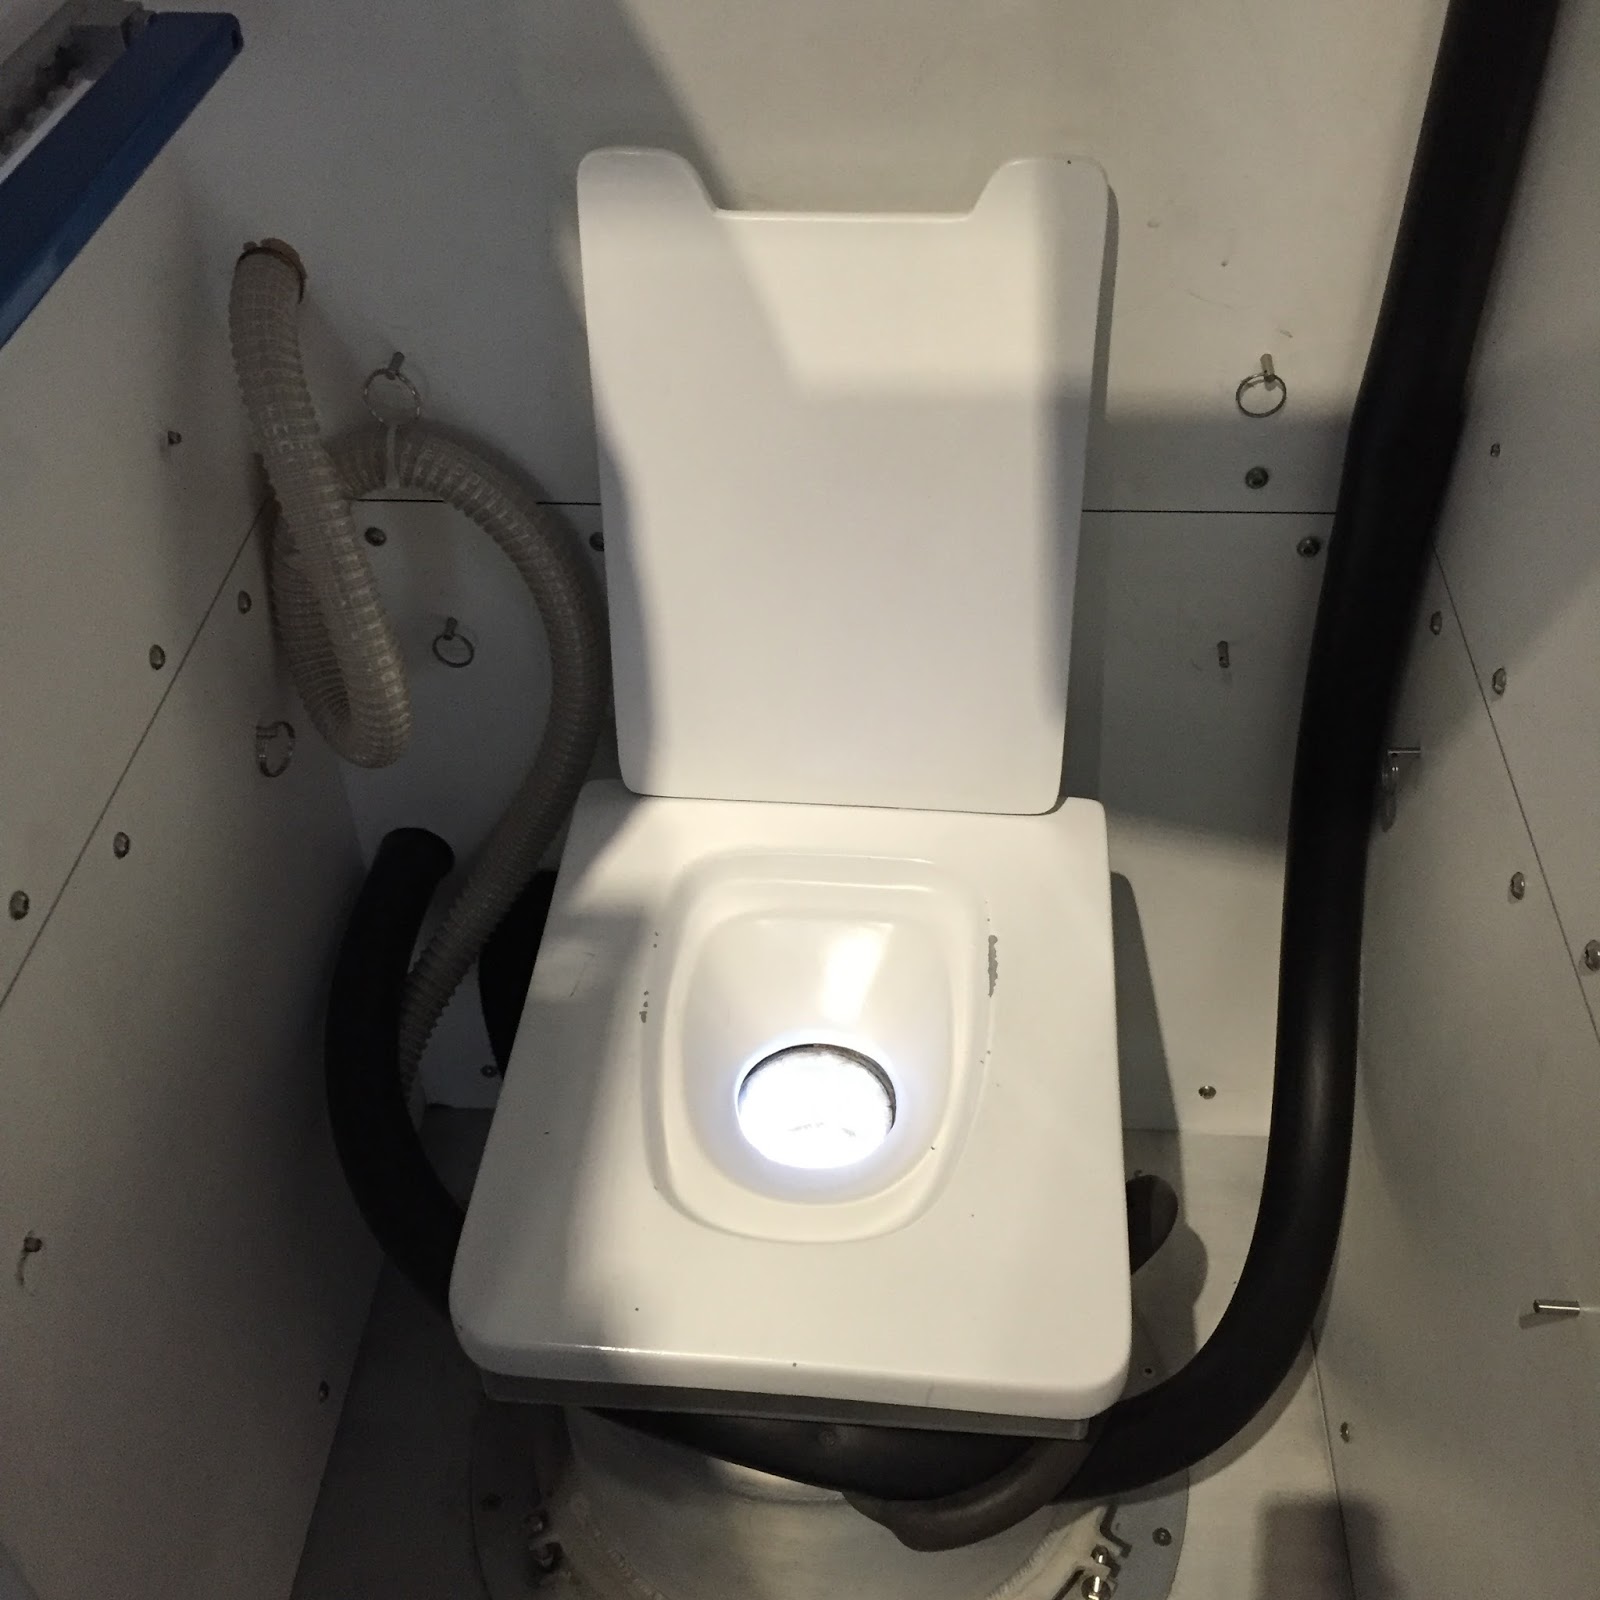
We were able to visit Kennedy Space Center in late May. Since I had just finished reading Space Caseby Stuart Gibbs(Truman Nominee by the Missouri Association of School Librarians), I was intrigued by the space technologies, and how Gibbs had enhanced them for his futuristic novel. Three things that Stuart emphasizes in his story that I was able to see first hand: sleeping in space (the characters in the story sleep in pods in the wall), spacesuits, and space toilets (always a student favorite - toilet humor).
Strap yourself in while you sleep so you don't float away.
Spacesuit
Space Toilet
I discovered the term "NASA Spin-off"when I spotted the Space Blanket in the gift shop. It was developed in 1964 by "vacuum-depositing a very precise amount of pure aluminum vapor onto a very thin but durable, film substrate. This technical process forms a "perfect reflective barrier" that captures and helps to retain and focus over 80% of a person's radiated body heat." It is used by militaries, medical personnel, disaster preparedness and relief agencies, and search and rescue groups.
It is small enough that it fits in one hand when you open it.
NASA has a publication and a website to highlight technologies "that are benefiting life on earth in the form of commercial products". This would be a great launch pad for innovation studies.
If you have a chance to visit the Kennedy Space Center, be sure to check out the Space Shuttle Launch Experience, which simulates what it is like to blast off. The best description I head was "it is like driving down a gravel road at 80 miles per hour". Also fun, the Kennedy Space Center Bus Tour, which takes about an hour, and gives you views of the launchpads and buildings. And be sure to check out the Space Shuttle Atlantis Exhibit.